A Step-By-Step Guide to Change a Tire

Flat tires. Nobody likes them, and nobody ever wants to have to deal with one. Still, the truth is they can happen at virtually any time, whether it is during, before, or after any drive. All it takes is a loose nail, broken glass, curb hop, or neglected tire maintenance, and suddenly you're stranded.
But low and behold, not all hope is lost. With the spare tire or donut your vehicle is equipped with and this handy dandy tire changing guide, you'll get back on the road in no time.
Editor’s Note: This blog has been updated as of 2023 to reflect current industry standards and technical knowledge.
How to Change a Tire
If you're in a pinch, here's a quick step-by-step guide to changing your vehicle tire with your spare tire or donut, jack, and tire iron:
1. Make sure your car is parked on a safe, flat surface, with the emergency brakes on.
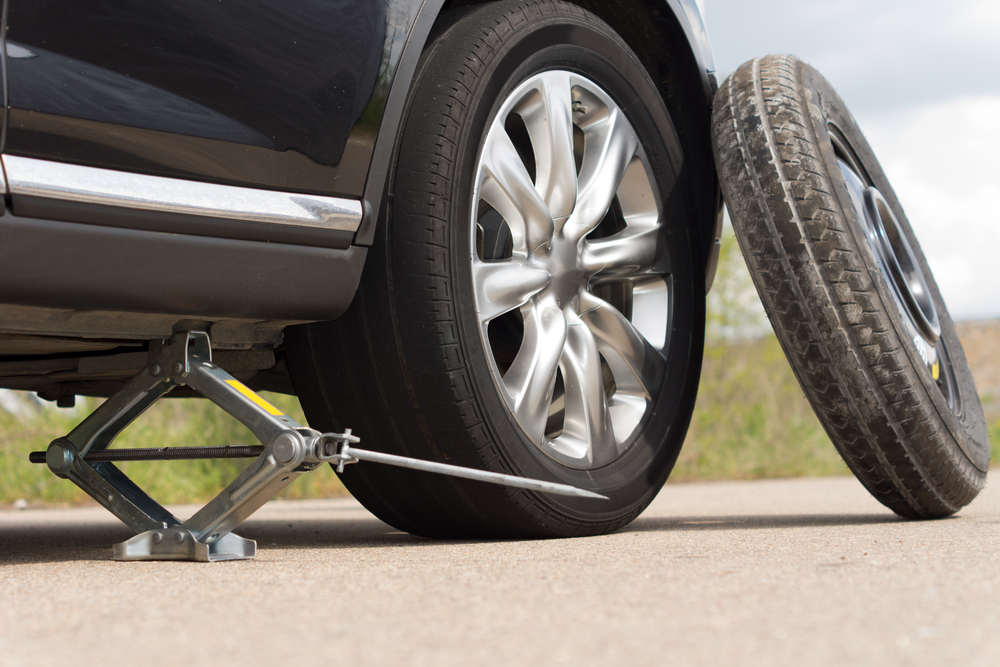
2. Place the jack under the metal frame, closest to the damaged tire, and use the jack to support the car.
3. Remove the wheel’s hub cap (if your car has them), loosen the lug nuts, and then crank the jack to lift the car up until the tire is just off the ground.
4. Remove the lug nuts entirely and take the tire off the wheel.
5. Put on the spare tire by aligning the rim of the tire with the wheel bolts and reapplying the nuts.
6. Tighten the lug nuts equally by hand (but not all the way) and lower the car back onto the ground.
7. Remove the jack and finish tightening the lug nuts with your tool.
Once you have the damaged tire off, place it in your trunk, and bring it to your local tire service professional. We'll be able to take a look, estimate the cost of repair, or properly dispose of it and get you on the road again with a more permanent solution.
Searching for a detailed guide on changing a tire? Our local auto mechanics break down each step of changing your flat, blown-out, or damaged tire:
Move to a Safe Place
If you're on a busy highway or road, the last thing you want to do is work on your car close to vehicles moving at highway speeds. If you experience a flat tire, turn on your hazard lights to signal an issue, gradually slow down to a slow speed, and gently pull your car over to the shoulder as far as you can. You should have at least six feet of space between your driver's door and the farthest right lane, but more is always better.
Jack Up the Car
Your car almost certainly includes an emergency jack that can be used to lift the affected wheel off the ground so you can remove the tire. This can be located in a few different spots but is almost always found toward the vehicle's rear. Please consult your owner's manual to learn exactly where it is on your car.
Next, you'll need to locate a point on the frame of your car that's strong enough to support the weight of your vehicle as you jack it up. Expand the jack until it's just shorter than the distance between the ground and your lifting point, make sure the jack itself is stable, and then slowly crank the jack further to lift your car upward. Do this until your tire is a good two to three inches off the ground.
One bit of advice, and this is extremely important: do not lean against your car in any way while it's up on a jack stand. These stands are not the most stable, and the last thing you want to do is accidentally knock your car off the stand before you've replaced the wheel.
** Pro Tip: Loosen, but don't remove the lug nuts before lifting the car. We recommend this because loosening your lug nuts can require a lot of force, which can be daunting when your car is jacked up.
Remove the Lug Nuts
Your wheel is held on by a series of lug nuts, usually either five or six of them. Removing them does take some muscle, as an air gun usually attaches them for a tight fit with added security. They will be tight. In your glove box or possibly also in the area where you found your jack, you'll find a socket and lug wrench. Attach the socket to this wrench, place it over one of the lugs, and then begin to twist the lug in a counter-clockwise motion. Don't be surprised if this is difficult. However, with enough force, it will move.
One of your lugs may be different from the others and have some sort of odd design etched into it. This is a wheel lock and is commonly found on vehicles that have alloy or otherwise expensive rims. They can't be removed without the key lug, which is usually found in your glove box. The key only goes onto this lug in one way, so don't be surprised if it's a bit stubborn or finicky to get working.
Replace the Tire
Once the lugs have been removed, your wheel should come off easily, though it may be a bit heavy. Lift slightly and pull towards you, and it should come right off. Place the wheel in your trunk or the rear of your vehicle, as you won't want to be driving on it again until the tire gets replaced. Next, take the spare tire and place it on the wheel hub. The lug holes on the spare tire should perfectly match the spacing of the lugs themselves, so this should be a seamless fit.
Now, gather the lug nuts you removed and place them on the lugs to hold the wheel in place. Don't tighten them yet; we'll talk about that in a second. However, use your fingers to make sure the lug nuts are adequately hand-tightened. Do the same with the wheel lock lug nut as well.
Release Your Car
Now that your new tire is on and lug nuts are hand tightened, you can lower your car back down to the ground. Slowly crank your jack stand in the opposite direction so that it carefully lowers back down. Once it is fully sitting on its suspension again, you can collapse the jack fully.
Tighten the Spare
Now comes a tricky part: tightening your wheel. You'll want to do this by tightening bolts one after the other, directly across from the one you just tightened. This process will be slightly different depending on how many lugs are on your wheels.
For five-lug wheels, this means going in a "star" formation. In other words (assuming one lug is pointing directly to the top of your car), you'll go top, bottom-left, middle-right, middle-left, bottom-right.
For six-lug wheels, start with one lug, tighten the one immediately across from it, then move one lug clockwise and do the same. After you go clockwise twice, you should have tightened all six lugs.
You want these lugs to be tight, and this will take muscle. Get them as tight as you can. Once you are finished, return all tools to their proper storage place, and you are done!
A Few More Thoughts
When you're driving on a spare tire, drive carefully. Keep your speed at 60 miles per hour or lower, and do not drive on a spare tire for more than 50 miles unless you absolutely have to. When you can, bring your car to your local automotive shop to have your old tire replaced and re-installed to make your car safe again.
If you happen to have a 2-3 year old car, it’s possible you don’t have a spare or a donut. In some cases, the manufacturer installed a compressor and sealant kit instead, which is a temporary fix to help you drive straight to the repair shop. Finally, there are a few cars that have none of the options listed above but are equipped with run-flat tires, which will run a bit longer after a puncture. We recommend learning about your car to see what situation you would be in if your tire is damaged.
For us it’s about Driving Joy, so we hope this guide helps you or someone you know…or someone you don’t know who needs a hand!
Be sure to locate your closest Christian Brothers Automotive shop and schedule an appointment to double-check your tires are as safe as can be!

[1].jpg)
[2].jpg)
sunwash-tech-with-customer.png)
